Installing a barn door can be a rewarding DIY project, adding both functionality and style to your home. A barn door hardware kit provides all the components necessary for a successful installation, but understanding how to properly set it up can be a little tricky without the right guidance. In this blog, we will walk you through the process of installing a barn door hardware kit, step by step, so you can enjoy a smooth, functional sliding door in your space.
Tools and Materials Needed for Installation
Before you begin installing your barn door hardware kit, it’s important to gather the necessary tools and materials. Having everything you need on hand will ensure the installation goes smoothly, and you won’t have to stop midway to find a missing tool.
Tools You Will Need:
- Tape measure
- Level
- Drill
- Screwdriver
- Wrench or socket set
- Stud finder (for wall mounting)
- Pencil
- Safety goggles
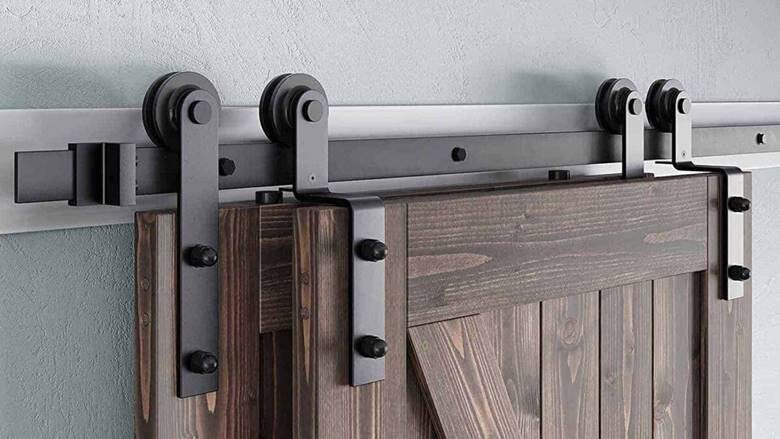
Materials Included in the Barn Door Hardware Kit:
- Track system
- Rollers
- End stops
- Floor guide
- Handles/pulls
- Mounting hardware (screws, bolts, etc.)
Now that you have your tools and materials ready, it’s time to start the installation process.
Step-by-Step Guide to Installing Your Barn Door Hardware Kit
Follow these steps to install your barn door hardware kit successfully. We’ll break it down in simple terms to help guide you through the process.
Step 1: Measure and Mark the Track Location
Start by measuring the width of your door and adding at least 1.5 times the door width to determine the length of the track you will need. The track should extend beyond the door’s edges to ensure smooth operation.
Use a pencil and tape measure to mark the location where the track will be mounted. Make sure the track will be level, and mark the spot where the center of the door will align with the track.
Pro Tip: If you’re mounting the track on a wall, use a stud finder to locate the studs for secure attachment.
Step 2: Install the Track
Once you’ve marked the track’s position, it’s time to install it. Use your level to ensure that the track is perfectly horizontal. Mark the spots for your mounting holes and drill pilot holes into the studs (or drywall anchors if you’re mounting on drywall).
Attach the track using the screws and bolts provided in your hardware kit. Tighten them securely to ensure the track is firmly in place.
Pro Tip: If you’re using a ceiling-mounted system, ensure that the ceiling can handle the weight of the door and hardware. Use appropriate ceiling anchors if necessary.
Step 3: Attach the Rollers to the Door
Next, attach the rollers to the top of the door. Most barn door hardware kits include brackets that are screwed into the top of the door. The rollers will then be mounted on these brackets, ensuring that they can glide smoothly along the track.
Follow the manufacturer’s instructions for attaching the rollers, making sure they are securely fastened to avoid any issues with movement.
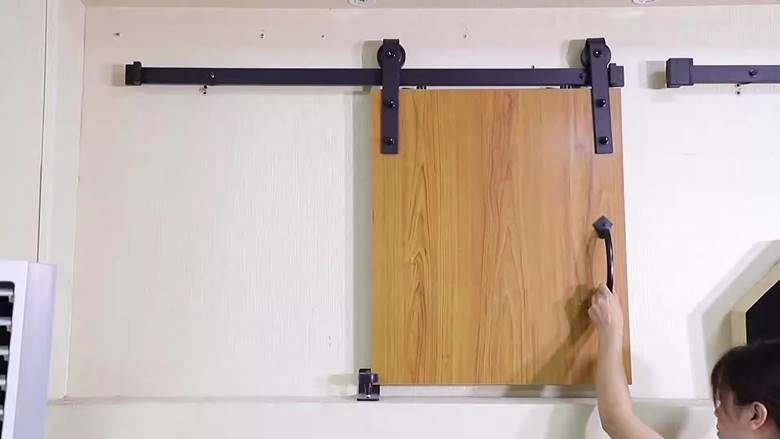
Step 4: Hang the Door on the Track
With the rollers securely attached, it’s time to hang the door. Lift the door and slide the rollers into the track. Ensure that the door is properly aligned with the track, and check that the rollers move smoothly when you slide the door.
You may need a second person to help lift the door, especially if it’s heavy. Take your time to ensure the door is properly centered and aligned.
Step 5: Install the Stops and Floor Guide
Now that your door is hanging on the track, you can install the stops. Place the end stops at each end of the track to prevent the door from sliding off. Tighten them securely so they stay in place.
Next, install the floor guide. The floor guide helps keep the door aligned as it slides, preventing any side-to-side movement. Depending on the kit you purchased, the floor guide will either be a U-shaped guide or a simple flat guide that sits on the floor.
Pro Tip: Adjust the floor guide if necessary to ensure it holds the door securely in place without interfering with its movement.
Step 6: Install the Handle or Pull
Once the door is securely mounted and aligned, attach the handle or pull to the door. This is the final step in the installation process. Use the provided screws to fasten the handle, making sure it is positioned at a comfortable height for easy use.
Step 7: Test the Door
Finally, it’s time to test your barn door! Slide it back and forth to make sure it moves smoothly along the track without any resistance. Check for any wobbling or misalignment and make necessary adjustments. Ensure that the door opens and closes quietly and securely.
If the door isn’t glide smoothly, check the alignment of the rollers and the track. Tighten any loose screws or bolts to eliminate any movement issues.
Common Mistakes to Avoid During Installation

While installing a barn door hardware kit is straightforward, there are a few common mistakes to watch out for during the process. Here are some things to avoid:
- Improper track length: Ensure that the track is long enough to accommodate the full width of the door and provides enough space for smooth sliding.
- Incorrect wall or ceiling mounting: Always ensure that the track is level and securely attached to studs or anchors to prevent the door from falling or wobbling.
- Ignoring weight capacity: Make sure that the hardware kit can support the weight of your door. Choosing a kit that’s too light for a heavy door can cause issues down the line.
- Skipping maintenance: Regularly check the hardware for wear and tear and lubricate the rollers to ensure smooth movement.
By avoiding these mistakes, you can ensure that your barn door hardware kit functions properly and lasts for years to come.
Conclusion
Installing a barn door hardware kit can be a simple and rewarding process with the right guidance. By following these step-by-step instructions and taking care to measure and install correctly, you can enjoy a beautiful, functional barn door that adds charm and practicality to your home.
At Barn Doorz, we provide high-quality barn door hardware kits that include everything you need for a successful installation. Whether you’re a seasoned DIYer or a first-timer, our kits are designed to make the process as easy as possible. Visit our website to explore our wide selection of barn door hardware kits and find the perfect fit for your space!